It is a collection of objects that are used to represent objects in application.Basically,object means any data in application that supports methods and properties. QTP support two types of objects as,
Test Object(TO) :- QTP creates an object during recording mode that correspond to object in application called as Test Object.The properties of objects are stored in in Object Repository that are used to identify object during run session.
Run Time Object(RO) :- The object that QTP uses to identify actual object in application during run session is Run Time Object. QTP uses the properties stored in object repository to identify actual object in application during run session.
You can add objects in object repository simply by recording events in application or by manually in object repository.
Both TO and RO supports various properties and methods.These properties can be retrieved using GetRO property and can be set using SetTO property.
 Use Object Spy to view properties and methods supported by objects.
Object Hierarchy in QTP:-
It is very important to understand how QTP maintains object hierarchy. It will simplify your expert view also and helpful when we use Descriptive Programming.
If object is on simple page then Hierarchy will be as shown:-


In the expert view,you can view your statement as:-
Browser(" ").Page(" ").WebList(" ").Select" "
If object is on simple page having frame then Hierarchy will be as shown:-


In the expert view,you can view your statement as:-
Browser(" ").Page(" ").Frame("MainFrame").WebElement(" ").click
If object is on Window then Hierarchy will be as shown:-

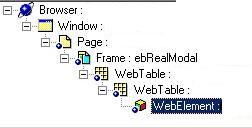
In the expert view,you can view your statement as:-
Browser(" ").Window(" ").Page(" ").Frame("ebRealModal").WebElement(" ").click
Browser(" ").Window(" ").Window(" ").Page(" ").Frame("ebRealModal").WebElement(").click
Important Points:-
Test Object(TO) :- QTP creates an object during recording mode that correspond to object in application called as Test Object.The properties of objects are stored in in Object Repository that are used to identify object during run session.
Run Time Object(RO) :- The object that QTP uses to identify actual object in application during run session is Run Time Object. QTP uses the properties stored in object repository to identify actual object in application during run session.
You can add objects in object repository simply by recording events in application or by manually in object repository.
Both TO and RO supports various properties and methods.These properties can be retrieved using GetRO property and can be set using SetTO property.
Use Object Spy to view properties and methods supported by objects.Object Hierarchy in QTP:-
It is very important to understand how QTP maintains object hierarchy. It will simplify your expert view also and helpful when we use Descriptive Programming.
If object is on simple page then Hierarchy will be as shown:-

In the expert view,you can view your statement as:-
Browser(" ").Page(" ").WebList(" ").Select" "
If object is on simple page having frame then Hierarchy will be as shown:-

In the expert view,you can view your statement as:-
Browser(" ").Page(" ").Frame("MainFrame").WebElement(" ").click
If object is on Window then Hierarchy will be as shown:-
In the expert view,you can view your statement as:-
Browser(" ").Window(" ").Page(" ").Frame("ebRealModal").WebElement(" ").click
If object is on Window which is on other window then Hierarchy will be as shown:-


In the expert view,you can view your statement as:-
Browser(" ").Window(" ").Window(" ").Page(" ").Frame("ebRealModal").WebElement(").click
Important Points:-
- As you can see in the hierarchy ,there are some nested WebTables which are not recorded in statements.While Creating your script you don't have to deal with them as you can see in expert view.Bottom line is you can ignore them while viewing objects hierarchy.
- Whenever you record your script for Web application the first Web object is Browser then followed by others as in above cases.
- Frames are of two type viz, Main Frame and ebRealModal Frame.If the object is on window then its frame will always be ebRealModal frame.


